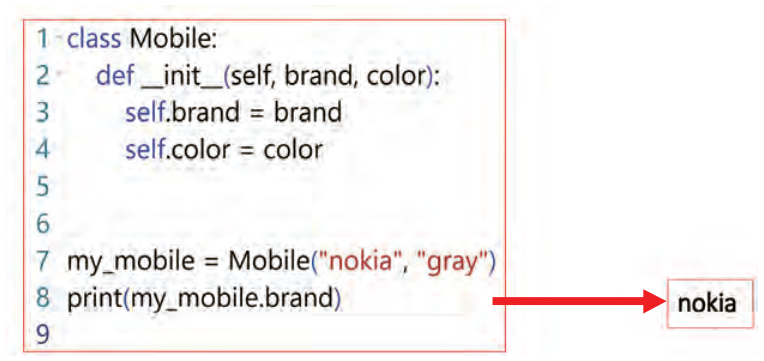
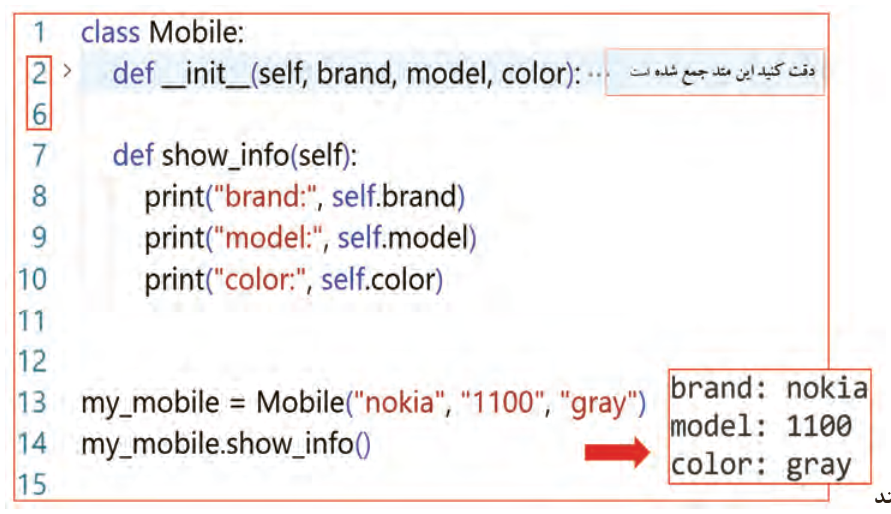
حالا نوبت آن است که در محیط برنامهنویسی، اولین کلاس (class) خود را ایجاد کنید و سپس با استفاده از آن کلاس، یک نمونه(Instance) بسازید. کد شکل 4 را درون یک فایل جدید به دقت تایپ کنید.
شکل ۴: اولین کد برای تعریف
کلاس و ساخت نمونه
خط 1: یک کلاس به نام Mobile تعریف میشود.
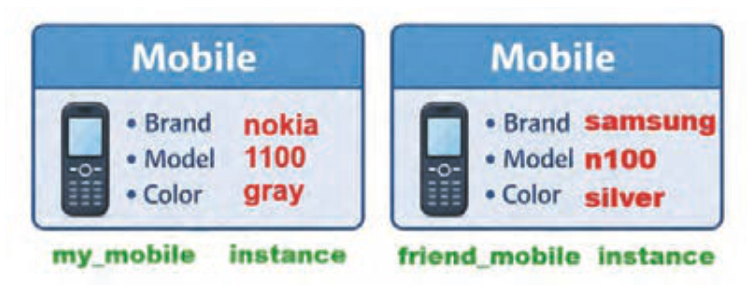
کلاس در واقع یک الگو یا نقشه برای ساختن موبایلهاست.
دقت کنید کلاس، خود موبایل نیست بلکه الگویی برای ساخت موبایلهاست.
بر اساس استانداردهای نامگذاری در پایتون (PEP8)، نام کلاسها باید با استفاده از شیوۀ PascalCase نوشته شود؛ به این معنا که حرف اول نام کلاس و حرف اول تمام کلمات تشکیلدهندۀ آن بزرگ باشد.
خط 2: این متد، نقش متدِ سازندۀ کلاس را در پایتون بر عهده دارد. به این متد اصطلاحاً initializer هم میگویند.
هر زمان که از کلاس Mobile یک نمونه ساخته شود، یعنی با اجرای خط 7، این متد بهطور خودکار اجرا میشود.
وظیفه اصلی این متد مقداردهی اولیه به ویژگیهای نمونه (Instance) است.
دقت کنید که __init__ نامی قراردادی در پایتون است و نمیتوان آن را تغییر داد. در سمت چپ و راست کلمه init دو بار کاراکتر زیرخط (underscore) تایپ شده است.
خطوط 3 و 4: ویژگیهای نمونه را مشخص میکنند.
هر موبایل یک برند و یک رنگ دارد.
در کد ارائه شده، self.brand و self.color هر دو به عنوان ویژگی (attribute) شناخته میشوند.
کلمۀ self به همان نمونهای اشاره میکند که در حال ساخته شدن است و brand و color نام ویژگیهایی هستند که به آن نمونه تعلق دارند.
صفحه ۲۳۹
خطوط 5 و 6: خطوط خالی
بر اساس استانداردهای کدنویسی پایتون (PEP8)، لازم است پس از پایان تعریف کلاس، دو خطِ خالی قرار داده شود تا مرز بین کلاس و بخش کدهای سراسری (Global) بهوضوح مشخص شود.
خط 7: ساختن نمونه(Instance)
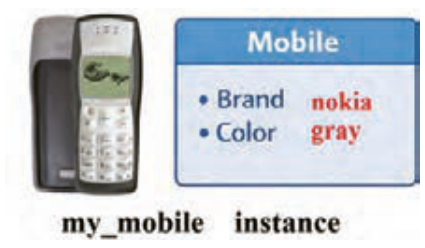
در این خط، یک نمونه (instance) به نام my_mobile از روی کلاس Mobile ساختهاید.
مقدار "nokia" برای ویژگیِ brand و مقدار "gray" برای ویژگیِ color در نظر گرفته شدهاند.
شکل ۵
خط 8: دسترسی به ویژگی
با استفاده از نام نمونه و علامت نقطه (.)، به ویژگیهای آن دسترسی پیدا میکنید.
این دستور مقدار ویژگی brand را برای نمونه my_mobile چاپ میکند.
خط 9: خط خالی
طبق استانداردهای PEP8، پس از پایان کدها نیز یک خط خالی قرار داده میشود تا انتهای فایل از کدها بهصورت خوانا و استاندارد مشخص شود.
توجه داشته باشید که اگر در این مرحله همۀ جزئیات را بهطور کامل متوجه نشدید، نگران نباشید؛ این یک مبحث جدید است و با ادامۀ آموزش و فعالیتهای بیشتر، مرور کدها و ساخت برنامههای بیشتر، به مرور، مفاهیم برایتان روشن میشود و جا میافتد.
حالا برنامه را اجرا کنید، میبینید که مقدار ویژگی brand از موبایلی که ساختهاید یعنی nokia چاپ میشود. توجه داشته باشید در این مرحله، کلاس فقط شامل ویژگیها (Attributes) است و فعلاً هیچ رفتار یا متدی (Method) بهجز سازنده (__init__) برای نمونهها تعریف نشده است.
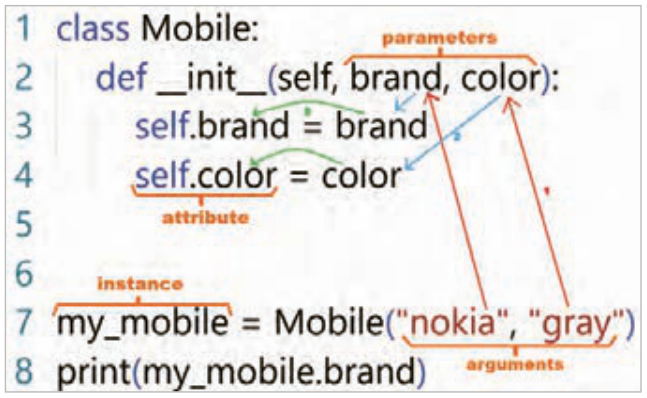
حالا با یک تصویر روند اجرای برنامه را شرح داده شده است. شکل 6 را به دقت مشاهده کنید.
شکل ۶: روند اجرای برنامه
صفحه ۲۴۰
همانطور که در شکل مشاهده میشود بعد از اجرای خط 7 که برای ساختن نمونه my_mobile است مراحل زیر اتفاق میافتد:
آرگومانهای "nokia" و "gray" به متد __init__ فرستاده و درون پارامترهای brand و color قرار میگیرند.
مقدار پارامتر brand درون self.brand و مقدار پارامتر color درون self.color ریخته میشوند.
در این مرحله نمونه مورد نظر ساخته خواهد شد.
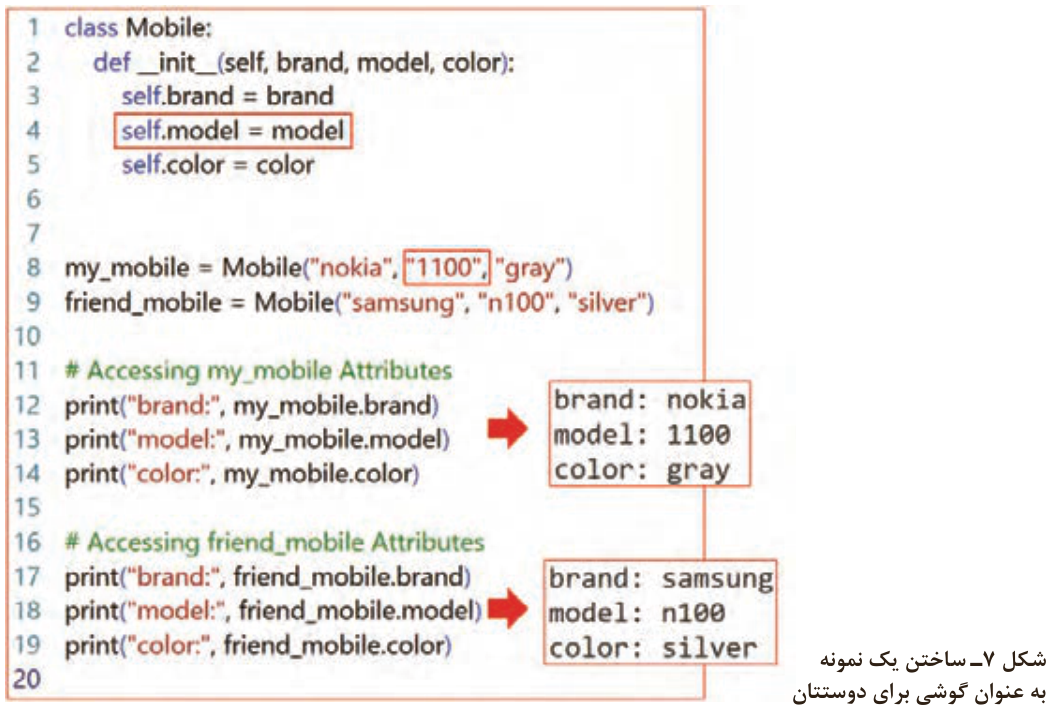
در ادامه بر اساس کلاسی که تعریف کردهاید یک نمونه دیگر به عنوان موبایلی برای دوستتان بسازید. کد شکل 7 را به دقت بنویسید.
شکل ۷: ساختن یک نمونه
صفحه ۲۴۱
خط 4: یک ویژگی جدید برای مدل گوشی همراه تعریف و مقداردهی شده است.
خط 9: یک نمونه جدید با نام friend_mobile با ویژگیهایی متفاوت از my_mobile ایجاد شده است.
شکل ۸
خطوط 15 تا 17: در این خطوط ویژگیهای نمونه دوم چاپ شده است.
در ادامه یک متد به کلاس Mobile اضافه کنید تا مقدار تمام ویژگیهای نمونهای که ساختهاید را چاپ کند. کد قبلی را مانند شکل 9 تغییر دهید.
شکل ۹: افزودن متد
show_info
صفحه ۲۴۲
خط 7: این خط، تعریف یک متد (method) به نام show_info را در داخل کلاس Mobile انجام میدهد. متدها، توابعی هستند که به یک کلاس مرتبط هستند و میتوانند به ویژگیهای (Attributes) آن کلاس دسترسی داشته باشند.
پارامتر self در تعریف متد، به خودِ نمونهای که متد روی آن فراخوانی میشود، اشاره میکند. به عبارت دیگر، self به کلاس Mobile اجازه میدهد تا به ویژگیهای (Attributes) خاص هر نمونه از نوع Mobile دسترسی پیدا کند.
خطوط 8 تا 10: این دستور، مقادیر ویژگیهای برند، مدل و رنگ نمونه را با استفاده از برچسبهای مشخص، نمایش میدهد.
خط 14: در این خط متد show_info از نمونه my_mobile فراخوانی و اجرا میشود.
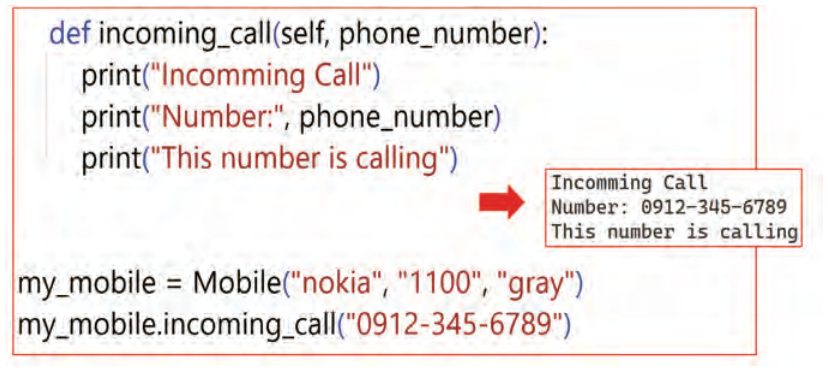
به همین ترتیب میتوانید متدهای بیشتری برای این کلاس تعریف کنید. به عنوان مثال متد incoming_call برای نمایش پیام هنگام تماس دریافتی میباشد. کدهای این متد را در زیرِ متدِ show_info براساس شکل 10 بنویسید.
شکل ۱۰: افزودن متد
incoming_call
اولین خط، تعریف متدی به نام incoming_call را در داخل کلاس Mobile انجام میدهد. این متد یک پارامتر به نام phone_number را دریافت میکند که نشاندهنده شماره تلفن تماسگیرنده است.
دستورات داخل متد، پیام "تماس ورودی" و شماره تلفن تماسگیرنده را در خروجی نمایش میدهند.
دقت کنید این متد باید درون کلاس Mobile و همسطح متد __init__ تعریف شود، بنابراین یک tab جلوتر از بدنه کلاس قرار میگیرد.
در آخرین خط برنامه متد incoming_call را بر روی نمونه my_mobile فراخوانی میکند.
آرگومان "0912-345-6789" به عنوان پارامتر phone_number ارسال میشود که نشاندهنده شماره تلفن تماسگیرنده است. سپس متد اجرا میشود و پیامهای مشخص شده و شماره تلفن ارائه شده را نمایش میدهد.
صفحه ۲۴۳
تعیین مقدار پیش فرض برای ویژگیها
برای جذابیت و کارایی بیشتر در ادامه، یک ویژگی تعریف خواهد شد که بعد از اجرای برنامه مقدار آنها قابل تغییر باشند. از این رو درون کلاس، ویژگی وضعیت روشن و خاموش بودن (status) و یک مقدار پیش فرض هم برای آن تعریف خواهد شد. کافیست در متد __init__ یک ویژگی جدید مانند کد زیر تعریف کنید.
self.status = "on"
توجه داشته باشید هنگام تعریف نمونه دیگر ضرورتی ندارد مقداری برای این ویژگی تعریف شود.
تغییر مقدار ویژگی: در این روش پس از ایجاد نمونه my_mobile به سادگی با نوشتن کد زیر، مقدار آن تغییر خواهد کرد.
در این دستور از نشانه dot یا همان نقطه برای دسترسی به ویژگی یک نمونه استفاده شده است. این خط از پایتون میخواهد برای نمونه my_mobile ویژگی status مرتبط با آن را پیدا کند و در ادامه مقدار " off" را درون آن قرار دهد.
ارثبری (Inheritance)
فرض کنید در یک شرکت تولیدکنندۀ گوشی همراه، تاکنون تنها نسخههای پایۀ تلفن همراه تولید میشده است؛ گوشیهایی که امکانات آنها به ویژگیهایی مانند برند، مدل، رنگ و وضعیت محدود بوده و فاقد سیستمعامل و دوربین هستند. مهم ترین کاری که با این گوشیهای همراه میتوان انجام داد، تماس تلفنی و ارسال پیامک است. در این شرکت، یک کلاس اصلی به نام Mobile وجود دارد که این ویژگیهای پایه را مدلسازی میکند.
حالا شرکت تصمیم گرفته است نسل جدیدی از گوشیهای همراه را طراحی کند؛ گوشیهای هوشمند (Smartphone) که در کنار ویژگیهای پایۀ گوشی همراه، قابلیتهایی مانند سیستمعامل و دوربین را ارائه میدهند و همچنین مدلهایی تخصصیتر، مانند گوشیهای مناسب بازی (Gaming phone)، که برای اجرای بهتر بازیها با امکانات سختافزاری قویتر طراحی شدهاند.
Smartphone: تلفن هوشمند نوعی تلفن همراه است که با بهرهگیری از سیستمعامل (Operating System)، امکان اجرای برنامهها و ارائۀ قابلیتهای پیشرفته، فراتر از تماس و پیامک را فراهم میکند.
دارای ویژگی دوربین پیشرفته
دارای ویژگی سیستم عامل قابل نصب و ارتقا
Page 238
Now it is time to create your first class in the programming environment and then, using that class, make an instance. Type the code of Figure 4 carefully into a new file.
Figure 4: The first code for defining
a class and making an instance
Line 1: a class named Mobile is defined.
A class is in fact a pattern or a plan for making mobiles.
Note that the class is not the mobile itself but a pattern for making mobiles.
According to the naming standards in Python (PEP8), class names must be written in the PascalCase style; that means the first letter of the class name and the first letter of all the words that make it up are capital.
Line 2: this method plays the role of the class's constructor method in Python. This method is also called the initializer.
Whenever an instance is made from the class Mobile, that is, by running line 7, this method runs automatically.
The main job of this method is to give initial values to the properties of the instance.
Note that __init__ is a conventional name in Python and cannot be changed. On the left and the right of the word init, the underscore character is typed twice.
Lines 3 and 4: specify the properties of the instance.
Each mobile has a brand and a colour.
In the code given, self.brand and self.color are both known as attributes.
The word self points to the very instance that is being made, and brand and color are the names of properties that belong to that instance.
Page 239
Lines 5 and 6: empty lines
According to the Python coding standards (PEP8), after the end of the class definition two empty lines must be put so that the border between the class and the global code part is clearly marked.
Line 7: making an instance
In this line you have made an instance named my_mobile from the class Mobile.
The value "nokia" is given for the property brand and the value "gray" for the property color.
Figure 5
Line 8: reaching a property
By using the name of the instance and the dot (.), you reach its properties.
This statement prints the value of the property brand for the instance my_mobile.
Line 9: an empty line
According to the PEP8 standards, after the end of the code an empty line is also put so that the end of the file is marked from the code in a readable and standard way.
Note that if you did not fully understand all the details at this stage, do not worry; this is a new topic, and as the lessons continue, with more activities, reviewing the code and building more programs, the concepts will gradually become clear and settle in.
Now run the program; you will see that the value of the property brand of the mobile you made, that is nokia, is printed. Note that at this stage the class contains only attributes and for now no behaviour or method other than the constructor (__init__) has been defined for the instances.
Now the running process of the program is described with a picture. Look carefully at Figure 6.
Figure 6: The running process of the program
Page 240
As seen in the figure, after line 7 runs, which is for making the instance my_mobile, the following steps happen:
The arguments "nokia" and "gray" are sent to the method __init__ and put in the parameters brand and color.
The value of the parameter brand is put into self.brand and the value of the parameter color into self.color.
At this stage the wanted instance will be made.
Next, based on the class you defined, make another instance as a mobile for your friend. Write the code of Figure 7 carefully.
Figure 7: Making an instance
Page 241
Line 4: a new property for the phone's model is defined and given a value.
Line 9: a new instance named friend_mobile with properties different from my_mobile is created.
Figure 8
Lines 15 to 17: in these lines the properties of the second instance are printed.
Next, add a method to the class Mobile to print the values of all the properties of the instance you made. Change the previous code as in Figure 9.
Figure 9: Adding a method
show_info
Page 242
Line 7: this line defines a method named show_info inside the class Mobile. Methods are functions that are related to a class and can reach the attributes of that class.
The parameter self in the definition of the method points to the very instance on which the method is called. In other words, self lets the class Mobile reach the attributes specific to each instance of type Mobile.
Lines 8 to 10: this statement shows the values of the brand, model and colour properties of the instance with clear labels.
Line 14: in this line the method show_info of the instance my_mobile is called and run.
In the same way you can define more methods for this class. For example the method incoming_call is for showing a message when a call is received. Write the code of this method under the method show_info according to Figure 10.
Figure 10: Adding a method
incoming_call
The first line defines a method named incoming_call inside the class Mobile. This method receives a parameter named phone_number, which shows the phone number of the caller.
The statements inside the method show the message "Incoming call" and the caller's phone number in the output.
Note that this method must be defined inside the class Mobile and at the same level as the method __init__, so it is placed one tab further in than the body of the class.
In the last line of the program, the method incoming_call is called on the instance my_mobile.
The argument "0912-345-6789" is sent as the parameter phone_number, which shows the caller's phone number. Then the method runs and shows the specified messages and the given phone number.
Page 243
Setting a default value for properties
For more interest and efficiency, next a property will be defined whose value can be changed after the program runs. So inside the class, the property of the on and off state (status) will be defined and a default value for it too. It is enough to define a new property in the method __init__ like the following code.
self.status = "on"
Note that when defining another instance there is no need to give a value for this property.
Changing the value of a property: in this way, after creating the instance my_mobile, its value will be changed simply by writing the following code.
In this statement the dot sign is used to reach the property of an instance. This line asks Python to find the property status related to the instance my_mobile and then put the value "off" in it.
Inheritance
Suppose that in a mobile phone manufacturing company, until now only basic versions of the mobile phone have been produced; phones whose features are limited to properties such as brand, model, colour and status, and that have no operating system and no camera. The most important thing that can be done with these mobile phones is making phone calls and sending text messages. In this company there is one main class named Mobile that models these basic properties.
Now the company has decided to design a new generation of mobile phones: smartphones (Smartphone), which, besides the basic features of a mobile phone, offer capabilities such as an operating system and a camera, and also more specialised models, such as gaming phones, which are designed to run games better with stronger hardware.
Smartphone: a smartphone is a kind of mobile phone that, by using an operating system, makes it possible to run applications and offers advanced capabilities beyond calls and text messages.
Has an advanced camera property
Has an installable and upgradable operating system property