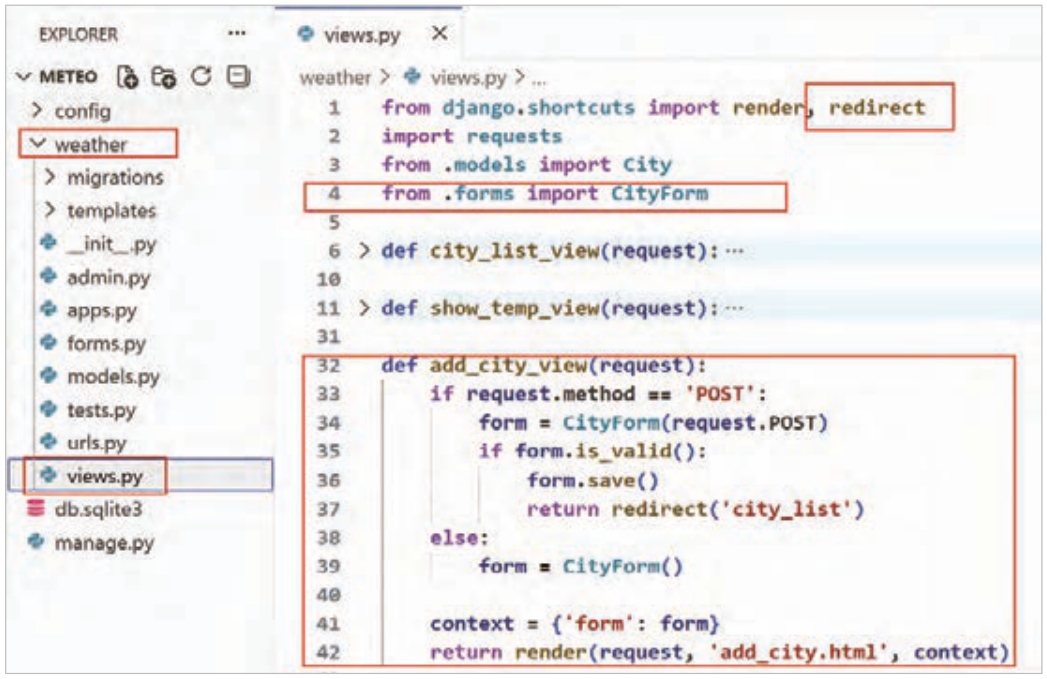
مرحله سوم: در فایل views.py تابع add_city_view را همانند شکل 66 اضافه کنید.
شکل ۶۶: ایجاد view جهت افزودن شهر
توضیحات کدها:
خط 1: متد redirect درون این فایل import شده است.
خط 4: کلاس CityForm از فایل forms.py درون این فایل import شده است.
خط 33: اگر کاربر در صفحه «اضافهکردن شهر»، اطلاعات فرم را وارد کرده و دکمه «ذخیره شهر جدید» را کلیک کند، یک request از نوع post برای add_city_view ارسال میشود، در این خط نوع request با if بررسی شده است.
خط 34: یک فرم از CityForm براساس نوع درخواست ارسالشدۀ کاربر ایجاد و در متغیر form ذخیره شده است تا به کمک آن اطلاعاتی که کاربر بهوسیله آن فرم ارسال کرده است، ذخیره شود.
خط 35: تابع is_valid فیلدهای وارد شده کاربر را بررسی میکند. در request ارسال کاربر، باید فیلدهای اجباری مقدار گرفته باشند و همچنین نوع فیلدها صحیح باشد.
خط 36: در صورت معتبر بودن درخواست، اطلاعات در جدول city ذخیره خواهد شد.
خط 37: پس از ذخیره موفق اطلاعات شهر، کاربر به صفحه لیست شهرها منتقل خواهد شد.
خط 39: وقتی کاربر آدرس این صفحه را در مرورگر وارد میکند، یک درخواست از نوع GET اتفاق افتاده است، در این حالت، نوع request چیزی غیر از POST است، پس یک فرم جدید از CityForm ایجاد و در متغیر form ذخیره شده است تا فرم افزودن شهر به کاربر نمایش داده شود.
صفحه ۳۲۱
خط 41: فرم ساخته شده، در دیکشنری context قرار گرفته و در خط بعد به add_city.html ارسال شده است.
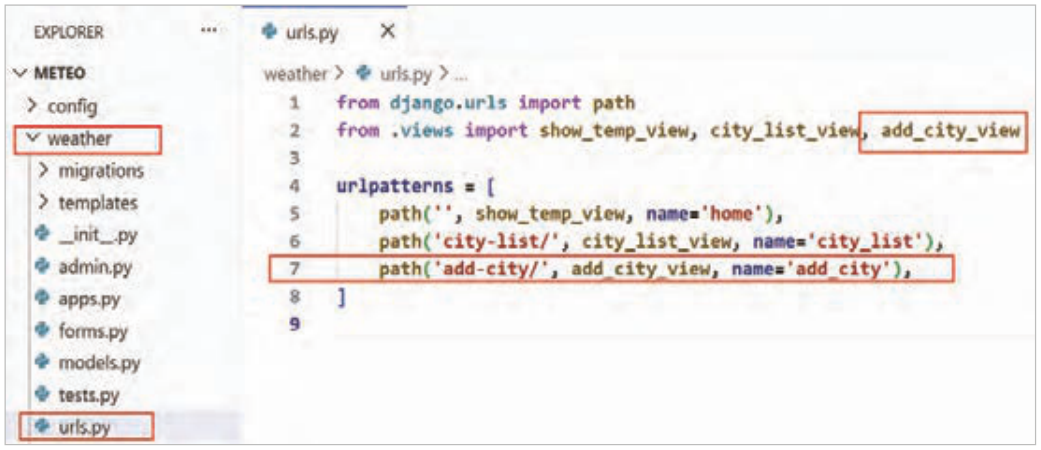
مرحله چهارم: در فایل urls.py مربوط به weather app یک path جدید همانند شکل 67 اضافه کنید.
شکل ۶۷: اضافهکردن path جدید برای افزودن شهر
توضیحات کدها:
یک path جدید جهت افزودن شهر اضافه شده است.
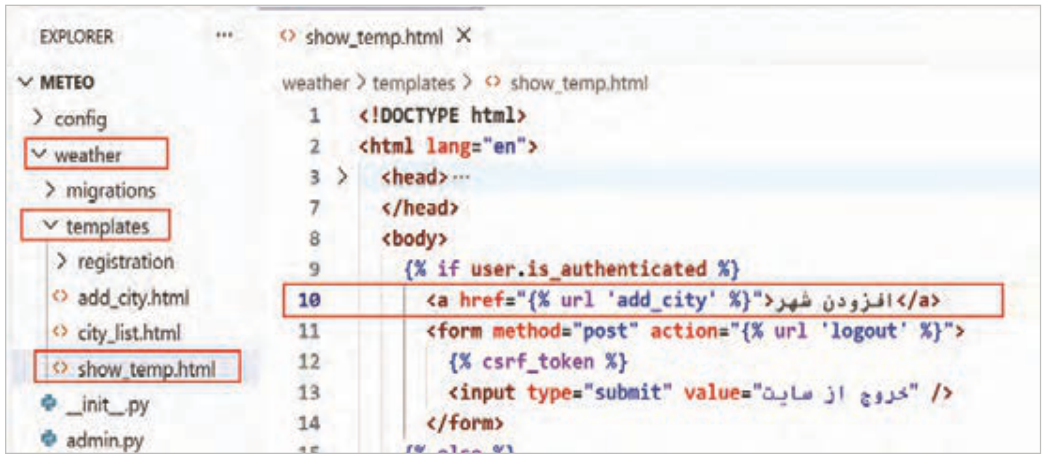
مرحله پنجم: در فایل show_temp.html یک لینک برای افزودن شهر، در خط 10 همانند شکل 68 اضافه کنید.
شکل ۶۸: ایجاد لینک به صفحه افزودن شهر
صفحه ۳۲۲
اکنون همه فایلها را ذخیره و صفحه اصلی سایت را refresh کنید.
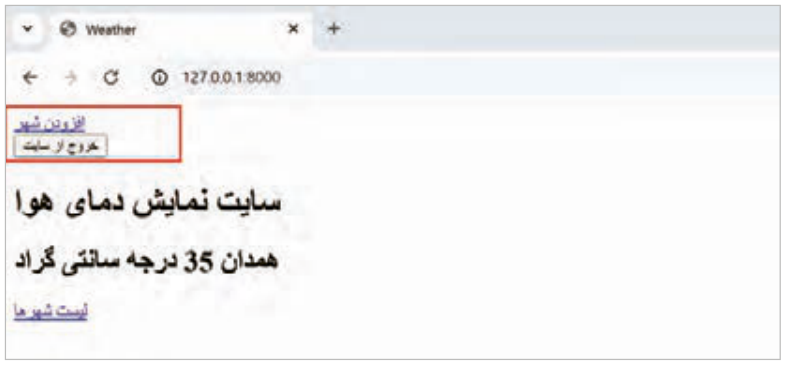
با دکمه [ورود به سایت] login کنید. لینک افزودن شهر برای شما نمایش داده خواهد شد (شکل 69).
شکل ۶۹: نمایش لینک پس از login کاربر
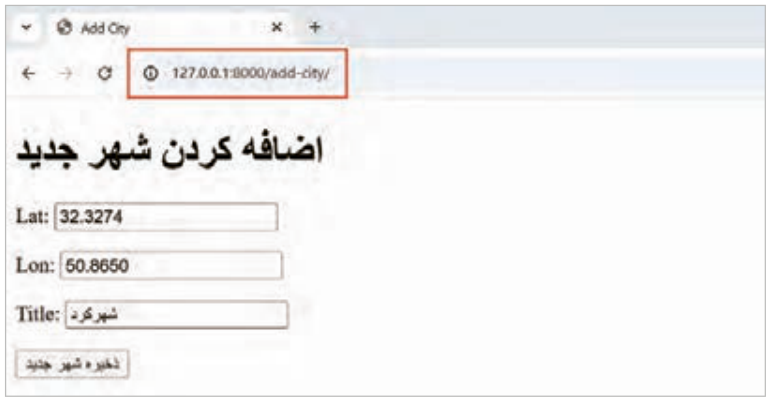
بر روی لینک «افزودن شهر» کلیک کنید، سپس همانند شکل 70، اطلاعات شهر موردنظر خود را وارد و دکمه ذخیره شهر جدید را کلیک کنید. در صورت ذخیره موفق اِین فرم، کاربر به صفحه لیست شهرها منتقل و شهر اضافه شده به انتهای لیست افزوده خواهد شد.
شکل ۷۰: فرم اضافهکردن شهر جدید
حذف شهر با کاربر عضو سایت
در این پروژه میتوانید امکان حذف شهرها را به کاربر عضو سایت بدهید، این کار را در سه مرحله میتوانید انجام دهید.
صفحه ۳۲۳
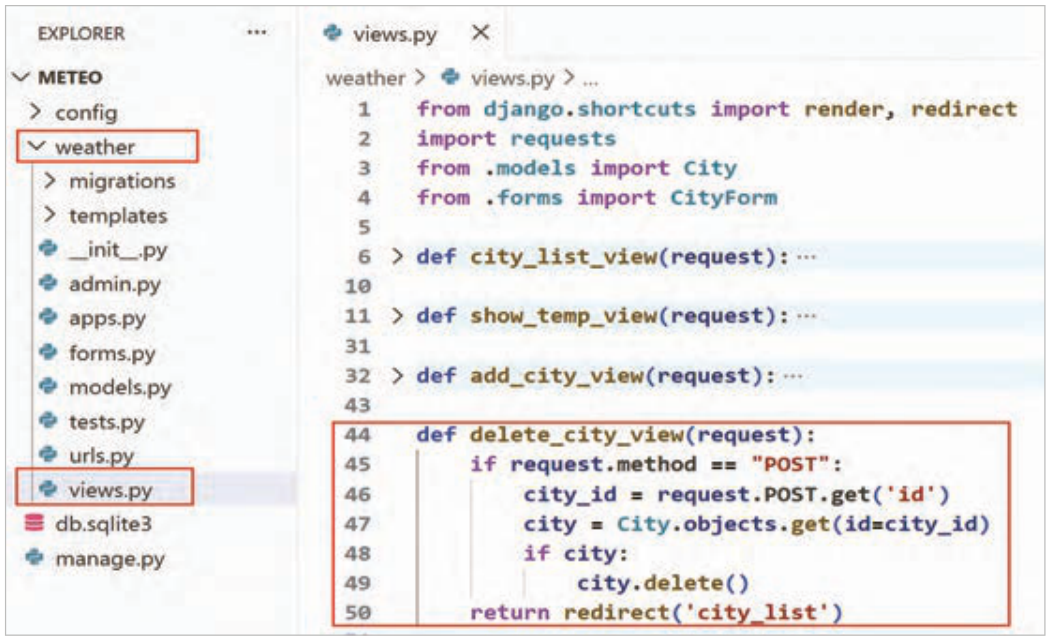
مرحله اول: یک view جدید با نام delete_city_view در views.py همانند شکل 71 ایجاد کنید.
شکل ۷۱: ساخت view جهت حذف شهرها
توضیحات کدها:
خط 49: دستور delete از ORM جنگو استفاده میکند و شهر انتخاب شده را از پایگاهداده حذف میکند.
خط 50: بعد از حذفکردن شهر، کاربر را به لیست شهرها منتقل میکند.
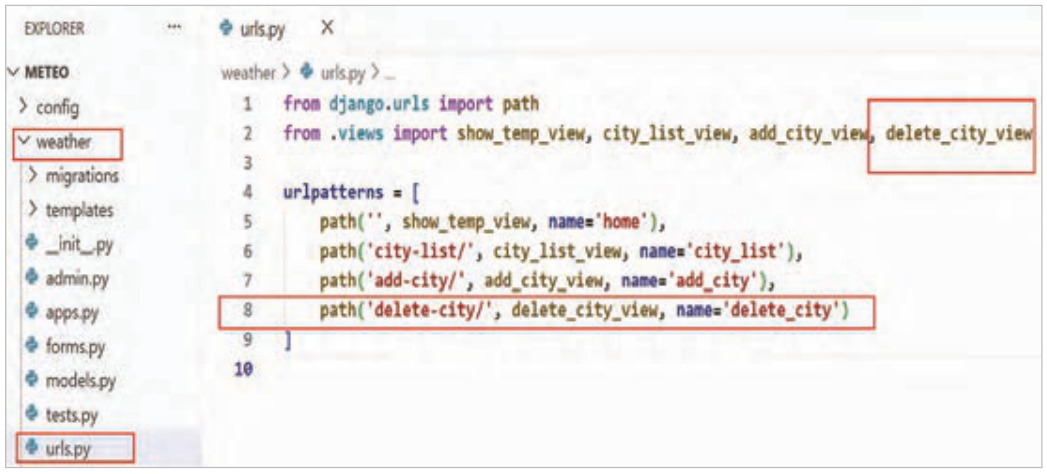
مرحله دوم: یک path جدید برای delete_city_view در urls.py همانند شکل 72 اضافه کنید.
شکل ۷۲: افزودن path جدید برای حذف شهرها
صفحه ۳۲۴
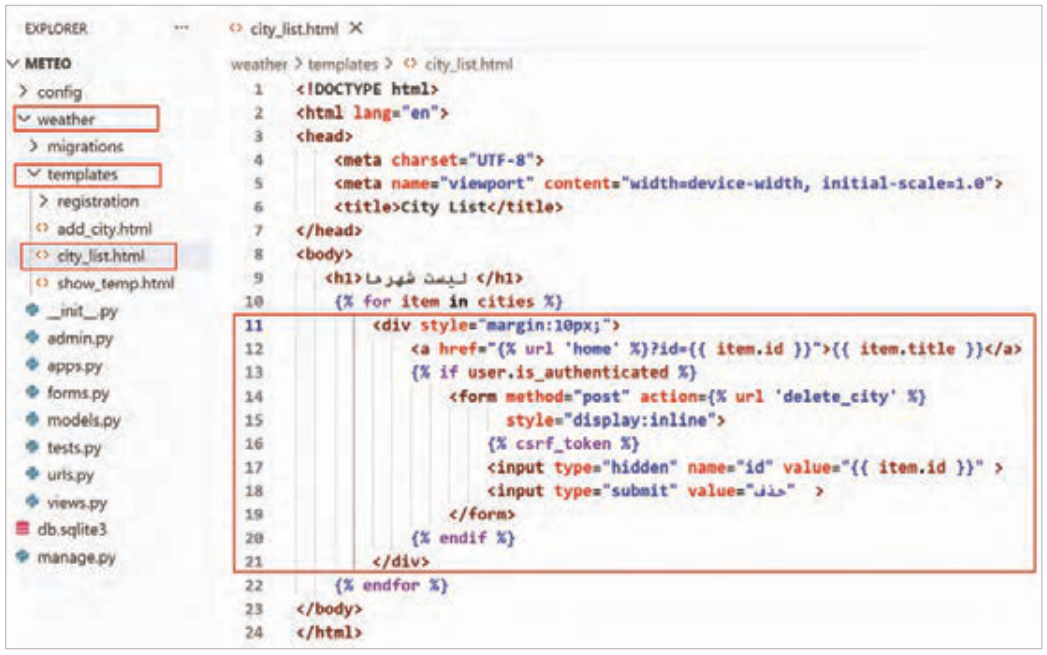
مرحله سوم: فایل city_list.html را همانند شکل 73 تغییر دهید.
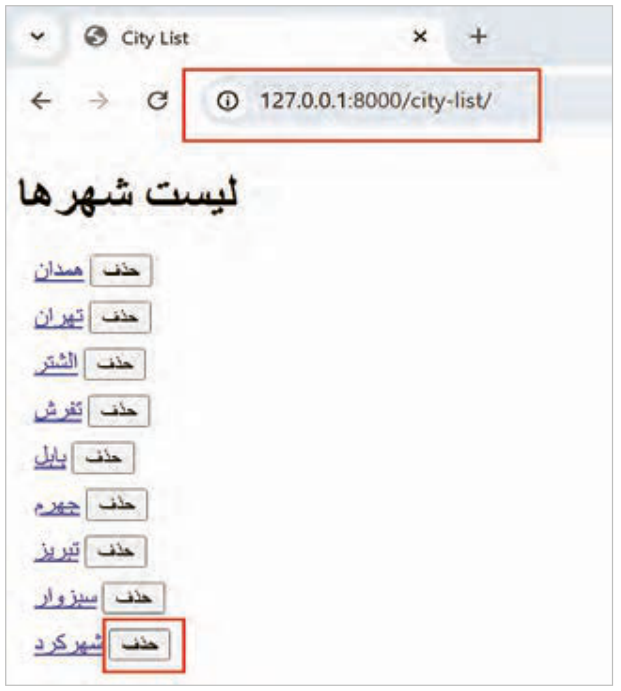
شکل ۷۳: اضافهکردن دکمه حذف به city_list.html
شکل ۷۴: دکمه حذف در لیست شهرها
توضیحات کدها:
خط 13: این دستور باعث میشود دکمه حذف شهر فقط برای کاربر login شده نمایش داده شود.
خط 14: یک فرم با متد از نوع POST ایجاد شده است. در action این فرم، به delete_city اشاره شده است، یعنی درخواست حذف به view حذف شهر ارسال خواهد شد.
خط 17: آیدی شهر بهصورت یک فیلد مخفی (hidden) اضافه شده است. آیدی شهر در خروجی نمایش داده نخواهد شد. فایلها را ذخیره کنید، صفحه لیست شهرها را باز کنید. خروجی همانند شکل 74 خواهد بود.
صفحه ۳۲۵
با کلیک روی لینک حذف مقابل هر شهر، شهر موردنظر حذف شده و لیست شهرها بهروزرسانی میشود. درصورتیکه کاربر مهمان باشد، لینک حذف را مشاهده نخواهد کرد.
بهینهسازی و امن کردن پروژه
در این مرحله، برای بهینهسازی پروژه، ایرادها و باگهای امنیتی پروژه بررسی میشوند.
باگ کدنویسی شماره یک:
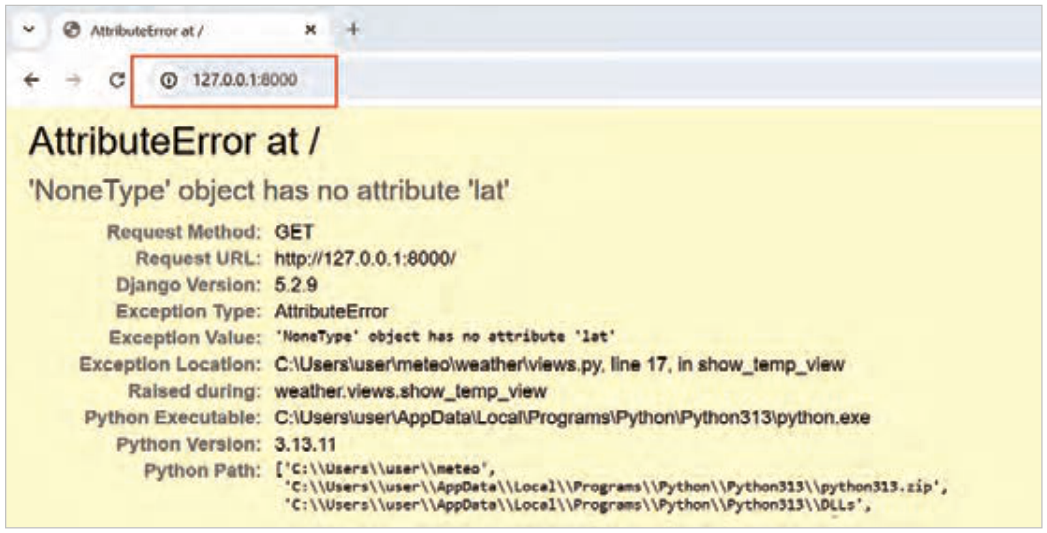
اگر هیچ شهری در جدول City وجود نداشته باشد یا همه شهرها حذف شده باشند، در صفحه اصلی سایت خطایی همانند شکل 75 مشاهده خواهد شد.
شکل ۷۵: خطا در صورت خالی بودن جدول شهرها
Page 320
Third step: in the file views.py add the function add_city_view as in Figure 66.
Figure 66: Creating a view to add a city
Explanation of the code:
Line 1: the method redirect is imported in this file.
Line 4: the class CityForm is imported from the file forms.py in this file.
Line 33: if the user, on the "Add city" page, enters the form's information and clicks the "Save new city" button, a request of the post type is sent to add_city_view; in this line the type of the request is checked with if.
Line 34: a form is created from CityForm based on the type of the user's sent request and stored in the variable form so that, with its help, the information the user has sent with that form is saved.
Line 35: the function is_valid checks the fields entered by the user. In the user's sent request, the compulsory fields must have received values and the types of the fields must be correct.
Line 36: if the request is valid, the information will be saved in the table city.
Line 37: after the city's information is saved successfully, the user will be taken to the page of the list of cities.
Line 39: when the user enters the address of this page in the browser, a request of the GET type has happened; in this case the type of the request is something other than POST, so a new form is created from CityForm and stored in the variable form so that the form for adding a city is shown to the user.
Page 321
Line 41: the form that was made is put in the dictionary context and in the next line is sent to add_city.html.
Fourth step: in the file urls.py of the weather app add a new path as in Figure 67.
Figure 67: Adding a new path for adding a city
Explanation of the code:
A new path for adding a city is added.
Fifth step: in the file show_temp.html add a link for adding a city, in line 10 as in Figure 68.
Figure 68: Creating a link to the add city page
Page 322
Now save all the files and refresh the main page of the site.
Log in with the [Sign in] button. The link for adding a city will be shown to you (Figure 69).
Figure 69: Showing the link after the user's login
Click on the link "Add city", then, as in Figure 70, enter the information of the city you want and click the button Save new city. If this form is saved successfully, the user is taken to the page of the list of cities and the added city is added to the end of the list.
Figure 70: The form for adding a new city
Deleting a city with a member user of the site
In this project you can give the member user of the site the ability to delete cities; you can do this in three steps.
Page 323
First step: create a new view named delete_city_view in views.py as in Figure 71.
Figure 71: Making a view to delete cities
Explanation of the code:
Line 49: the statement delete uses Django's ORM and deletes the chosen city from the database.
Line 50: after deleting the city, it takes the user to the list of cities.
Second step: add a new path for delete_city_view in urls.py as in Figure 72.
Figure 72: Adding a new path to delete cities
Page 324
Third step: change the file city_list.html as in Figure 73.
Figure 73: Adding a delete button to city_list.html
Figure 74: The delete button in the list of cities
Explanation of the code:
Line 13: this statement makes the delete-city button shown only to a logged-in user.
Line 14: a form with a POST-type method is created. In the action of this form, delete_city is pointed to, that is, the delete request will be sent to the delete-city view.
Line 17: the id of the city is added as a hidden field. The id of the city will not be shown in the output. Save the files and open the page of the list of cities. The output will be as in Figure 74.
Page 325
By clicking the delete link opposite each city, the wanted city is deleted and the list of cities is updated. If the user is a guest, they will not see the delete link.
Optimising and securing the project
At this step, to optimise the project, the flaws and security bugs of the project are checked.
Coding bug number one:
If there is no city in the table City or all the cities have been deleted, an error as in Figure 75 will be seen on the main page of the site.
Figure 75: The error when the table of cities is empty
 شکل ۷۳: اضافهکردن دکمه حذف به